


Harvesting nature’s bounty. Imagine turning every Brisbane downpour into free water for your home. Rain Water Tank Installation in Brisbane has surged as savvy homeowners realize they can catch dozens of litres off the roof instead of watching it disappear. Not only does this make your home more self-sufficient, it can dramatically cut water bills and lighten your footprint on the environment.
Brisbane averages over 1000 mm of rain per year, so installing a tank here can pay off quickly. Brisbane City Council notes that a rainwater tank “conserves water” and “saves money” – tick boxes on any eco-friendly checklist.
A properly sited tank is like a mini dam at your house: instead of sending clean rain into drains, you store it for gardens, washing cars, or even as backup during summer restrictions. Think of it as putting Aussie natural abundance to work right at your home.
- Save money: Free rainwater means using less mains water – good news for your wallet.
- Eco-friendly gardening: Plants love rainwater (chlorine-free and full of nutrients). Your lawn and veggie patch will stay lush even in dry spells.
- Water security: A tank offers backup supply during hot summers or outages, easing demand on city water.
- Reduced runoff: By capturing rain, you also cut stormwater pollution and lower infrastructure strain.
In short, Rain Water Tank Installation in Brisbane isn’t just green bragging – it’s practical. You lower bills, help the environment, and turn rainstorms into an advantage. For the eco-savvy, Rain Water Tank Installation in Brisbane is like a rite of passage in sustainable home upgrades.
As more eco-minded Brisbanites catch on, it’s nearly a status symbol – bragging rights at the next barbecue, you might say. Who wouldn’t grin when their garden drinks free rainwater instead of tap water? It’s proof you’re saving both water and money (talk about win-win).
Planning Your Rain Water Tank Installation in Brisbane
Before you go shopping for a barrel, some planning is key. Start by picking where the tank will live: ideally right under a big roof area, near existing downpipes. The more roof feeding it, the more water you collect.
Check your yard and council rules – in most suburban zones you won’t need special planning approval as long as the tank isn’t huge or blocking neighbors. But you will need a building approval if the tank plus stand is taller than 2.4 m or very close to a property line. Before deciding, it’s worth reviewing the Brisbane City Council’s official rainwater tank guide for details on permitted uses, size limits, and approval requirements.
Brisbane Council suggests you consider “size, location and how it will be used” before buying. So, jot down your needs: maybe just garden irrigation, or do you also want to flush toilets and run laundry? That drives tank size. Council also advises checking that your tank meets Australian Standards and reviewing warranties.
Once you know size and spot, factor installation costs (concrete pad, pump, fittings) into your budget. Small tanks can start from around $500, but remember a decent pump and professional installation will add to the bill.
- Location & Roof Catchment: Choose the biggest roof section you can, and site the tank so gutters can feed it easily. This ensures you capture maximum rain.
- Tank Size & Material: A larger tank (2000–5000 L) holds more water but takes more space. We compare materials below (plastic, steel, fibreglass, concrete).
- Compliance: Most Brisbane homes don’t need planning approval, but check if any special rules apply. Always have a licensed plumber handle water connections.
- Budget: Prices vary. Basic plastic tanks start ~$500, while larger steel or concrete tanks cost more. Don’t forget installation: pump and plumber can add a thousand dollars or more.
Rainwater Tank Materials & Sizes
Different tank types have pros and cons. Here’s a quick comparison to help you choose:
| Material | Pros |
Cons |
|
Poly (plastic) |
Lowest cost and lightweight, UV-stabilised | Least durable (may degrade in sun) |
|
Corrugated Steel |
Very strong and durable, long warranty if coated |
Heavier, can corrode/rust if scratched |
| Fibreglass | UV-resistant and long-lasting |
Expensive; brittle edges; fewer local suppliers |
| Concrete | Extremely durable, huge capacity |
Very heavy; high installation cost; usually for large rural tanks |
Step-by-Step Rain Water Tank Installation in Brisbane
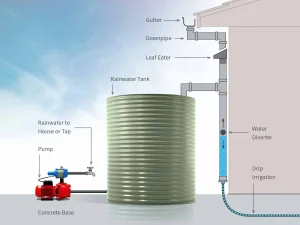
For a quick visual, check out the rainwater tank in the photo below. Example of a rainwater storage tank next to a shed. This standard plastic tank is plumbed into the building’s gutter (note the PVC pipes). Now, let’s break down the installation into simple steps:
- Prepare the site and base: Excavate or clear the ground and pour a level concrete slab or compact gravel base slightly larger than the tank. The base must support the weight (1 L = 1 kg – a full 5000 L tank weighs ~5000 kg!).
- Position the tank: With help, place the tank on its base. Ensure it is perfectly level and aligned with the roof downpipe(s).
- Install inlet plumbing: Cut your downpipe and fit a rainwater diverter into the tank. Install leaf filters on the gutters to keep debris out. Crucially, fit a first-flush diverter – this sends the initial dirty rainwater away from the tank.
- Connect pump & outlets: Many Brisbane systems add a pump for good pressure, or use mains trickle-fill to top up when the tank is low. A licensed plumber will also install a backflow-prevention valve if feeding toilets or taps.
- Set the overflow: Your tank’s overflow must drain safely. By regulation it should be piped to the stormwater system or a gravel soakage pit, so overflow never floods your yard.
- Check and finish: After installation, check all seals and taps. When it next rains, verify the tank is collecting water and pumping to your intended outlets. Label any rainwater taps to avoid mix-ups.
Maintaining Your Rainwater Tank
A bit of upkeep goes a long way:
- Keep it clean: Clear leaves and debris off the roof and gutters. Clean the first-flush diverter after every big storm.
- Inspect screens: Check inlet screens, filters, and lids regularly, especially after heavy rain. Replace any worn filters.
- Check for leaks: Look over the tank and fittings for cracks or rust (if it’s steel). Even small leaks should be fixed promptly.
- Drain sludge: Every few years (or if you see sediment) empty the tank to remove accumulated sludge. This prevents gunk from clogging taps.
- Control mosquitoes: Use fine mesh (<1mm) on all openings, and add a drop of vegetable oil to the water surface to smother larvae if needed.
With reasonable maintenance, rainwater tanks can last 20–30 years – a one-time project that keeps giving.
Choosing the Best Rainwater Tank Type for Brisbane Homes
If you’ve ever walked through a Bunnings or local supplier in Brisbane, you’ll know—rainwater tanks come in every shape and shade imaginable. It’s a bit like picking a pair of jeans: the right fit depends on your space, lifestyle, and taste. Let’s decode what works best for your Brisbane home.
1. Slimline Tanks – for Urban Blocks
Brisbane’s inner suburbs—think Paddington, New Farm, or Red Hill—don’t exactly scream “spare backyard.” Enter the slimline tank: narrow, tall, and sleek enough to tuck beside a fence or under an eave. They typically hold 1000–3000L, enough for watering plants and washing the car.
2. Round Poly Tanks – suburban all-rounders
If you’ve got a bit more elbow room, round poly tanks are unbeatable in value. They’re lightweight, low-cost, and made for Queensland’s sun. With UV-stabilised material, they’ll survive Brisbane’s brutal summers without fading or cracking. Plus, they blend easily behind a shed or deck.
3. Underground Tanks – hidden heroes
For those chasing minimal visual impact (or more lawn space for the kids), underground water tanks in Brisbane are the quiet achievers. They keep your yard uncluttered while storing up to 10,000L underground. The downside? Installation costs are higher—digging, reinforcing, and fitting pumps add up. But for high-end homes or limited blocks, they’re a design win.
4. Eco & Designer Tanks – when function meets flair
Here’s where Brisbane’s sustainability crowd shines. From modular tanks that double as retaining walls to coloured designer units that complement your home’s palette—eco water storage is becoming an architectural feature, not an eyesore. They’re more than just tanks; they’re part of your outdoor aesthetic.
Quick Tip Table – Choosing Your Ideal Tank
| Home Type | Recommended Tank | Capacity Range | Style Fit |
|---|---|---|---|
| Inner-city apartment | Slimline or modular | 1000–2000 L | Discreet, vertical |
| Suburban family home | Round poly | 3000–5000 L | Functional, low-cost |
| Modern or luxury home | Underground or designer | 5000–10,000 L | Sleek, hidden |
| Eco-conscious renovator | Modular eco tank | 2000–5000 L | Stylish & sustainable |
Urban Water Tank Trends in Brisbane
Lately, homeowners are getting creative—painting tanks to match exteriors, integrating them into decks, even pairing them with solar setups to create off-grid-ready systems. With rising water costs, eco water storage in Brisbane isn’t just for green thumbs anymore; it’s a practical lifestyle choice.
And here’s a fun thought: next time the summer storm rolls in, you’ll be listening to the rain on your roof… knowing every drop is landing right where it belongs—in your tank, not down the drain.
Cost, Incentives, and Verdict
For anyone considering this upgrade, Rain Water Tank Installation in Brisbane can have significant upfront costs, but the long-term savings often justify it. A small tank might cost a few hundred dollars, and a larger (3000–5000 L) tank $1,000–$2,000. Brisbane Council notes a 500 L tank starts around $500. On top of that, factor in plumber and pump costs (often $500–$1,500 more depending on system complexity).
There are no general Queensland rebates for household rainwater tanks right now. A few regional councils (mostly in farming areas) have offered rebates in the past, so check your local council’s website.
For young Brisbane homeowners, Rain Water Tank Installation in Brisbane is often worth it. Think of it as your home’s free water meter – after one Rain Water Tank Installation in Brisbane, a West End resident joked, his city water meter became jealous! It cuts your water bill, reduces runoff, and adds drought protection.
Brisbane City Council even notes rainwater is ideal for gardens, car washing and toilet flushes. If you’re keen to start, see the Brisbane City Council tank guide.
Frequently Asked Questions
Q: How much does rainwater tank installation cost in Brisbane? A: It depends on tank size and system complexity. A small 500L tank runs around $500, whereas larger tanks (2000–5000L) can be $1,000+ plus install costs. Get quotes for your needs.
Q: Do I need council approval for a rainwater tank? A: Usually not for residential tanks. In most Brisbane suburbs you don’t need planning approval unless the tank is very large or in a special zone. However, you do need a licensed plumber for connections to toilets or laundry, and a building permit if the tank is over 2.4m high.
Q: Is rainwater safe to drink from my tank? A: Council advises against using rainwater for drinking or cooking, because quality can vary. Tank water is great for non-potable uses though – watering gardens, flushing toilets, and laundry. If you need drinking water, either use mains or a certified treatment system.
Q: Are there rebates for installing rainwater tanks in Brisbane? A: There are currently no general QLD state rebates for rainwater tanks. Some regions occasionally offer grants, but Brisbane City Council itself does not give rebates. Always keep an eye on council news or statewide programs for any new incentives.
Q: How big a tank should I install? A: It depends on your roof area and needs. As a rough guide, every 100L of capacity stores about 50 flushes of toilet water. Many Brisbane homes opt for 2000–5000L to capture the full brunt of summer storms. Assess your water use and choose a size that makes sense.